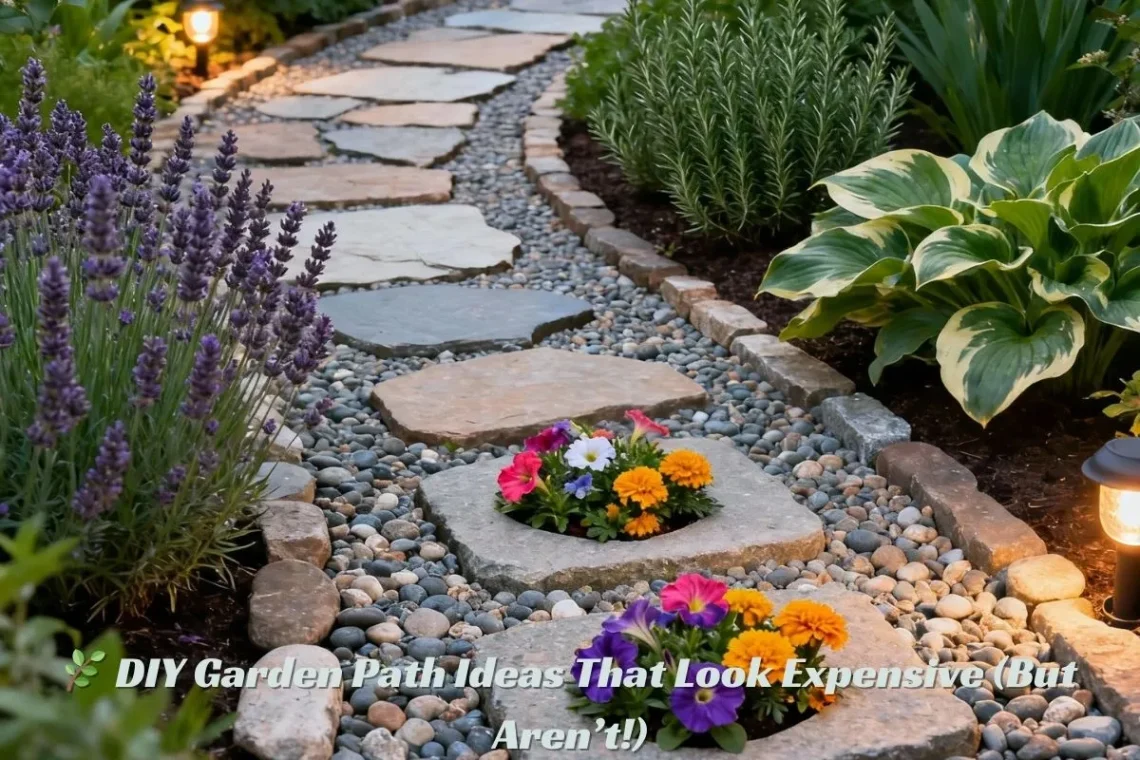
🌿 DIY Garden Path Ideas That Look Expensive (But Aren’t!)
There’s something magical about walking through a garden path. The crunch of gravel, the warmth of stepping stones under the sun, and the little details that guide your way — all these make a garden feel alive. The best part? You don’t need to spend thousands to create one. With a little creativity (and some weekend energy), you can design a stunning garden path right at home.
When I first started gardening, I thought making a path would be expensive. But after some trial and error (and a few muddy shoes), I learned that DIY garden paths can be both affordable and beautiful. It’s all about using what you have, planning smartly, and adding a touch of imagination.
In this guide, you’ll find practical, stylish, and budget-friendly DIY garden path ideas that look professionally done — even though you built them yourself!
🌼 Why Build a Garden Path?
A garden path does more than just help you walk without stepping on plants. It:
-
Connects different areas of your garden.
-
Adds structure and charm.
-
Keeps your lawn tidy (no muddy patches after rain!).
-
Makes your outdoor space look organized and welcoming.
It’s like giving your garden a “storyline.” You start at one end, walk along, and discover small surprises — flowers, benches, maybe a birdbath — along the way.
When I built my first path, I didn’t just create a walkway. I created a journey through my own backyard.
💰 What Is the Cheapest Way to Make a Garden Path?
If you’re on a budget, don’t worry — some of the best-looking paths cost almost nothing! The cheapest way to build a garden path is by using materials you already have or can get easily, like:
1. Gravel Paths
Gravel is one of the most affordable and flexible materials for garden paths. It’s easy to install, drains water well, and has a charming, rustic look.
All you need is:
-
A few bags of gravel (pea gravel or crushed stone)
-
Landscape fabric
-
Simple edging to keep it in place
Pro Tip: Use different colored gravel for borders or patterns. I once mixed white and gray gravel in a zigzag pattern — it looked fancy, but cost under $40.
2. Mulch Paths
Wood mulch or bark chips are super cheap and easy to spread. They blend beautifully with plants and feel soft underfoot.
However, you’ll need to top it up every year since it breaks down naturally.
3. Recycled Brick Paths
Got old bricks or pavers lying around? Don’t throw them away! Arrange them in fun patterns like herringbone or basket weave for a classic, timeless look.
The mismatched colors give your path character and charm.
4. Stepping Stones
You can make stepping stones from cement, wood slices, or even broken concrete pieces. They’re great for small paths winding through gardens or around flower beds.
Plus, kids love hopping from one stone to another — it’s fun and functional!
5. Grass or Clover Paths
Sometimes, the simplest option is just to trim a pathway through your grass or sow clover for a soft, natural trail. It’s basically free — and it smells amazing after rain.
🌿 What Is the Cheapest DIY Walkway?
Let’s dive deeper into truly DIY walkways — paths that you can make using household items or nature itself.
1. Pallet Wood Path
Old wooden pallets can be transformed into a rustic garden walkway. Just dismantle the pallets, sand the wood, and lay the planks directly on compacted soil.
I built one behind my vegetable garden — it cost me nothing but a few hours of work and gave my space a cozy farmhouse feel.
Pro Tip: Seal the wood with outdoor varnish to prevent rot.
2. Stone & Grass Mix
If you love a natural, uneven look, mix large flat stones with patches of grass in between. It feels organic and looks like it’s always been there.
3. Recycled Concrete (a.k.a. “Urbanite”)
Breaking up an old driveway or patio? Those chunks of concrete can become a free path.
Arrange them like stepping stones and fill gaps with soil or moss for a charming, eco-friendly look.
4. Pebble Mosaic Path
Collect pebbles and small stones, then press them into a sand base in artistic patterns — swirls, waves, or floral designs.
This one takes patience, but the result is absolutely stunning.
🧱 What Is the Cheapest Material to Make a Path?
Here’s a quick breakdown of affordable materials ranked by cost and durability:
| Material | Average Cost | Durability | Look |
|---|---|---|---|
| Mulch | Very Low | Low (needs renewal yearly) | Natural, warm |
| Gravel | Low | Medium-High | Rustic, classic |
| Recycled Brick | Low | High | Vintage, timeless |
| Wood Slices | Low | Medium | Whimsical, earthy |
| Concrete | Medium | Very High | Clean, modern |
Winner: Gravel is hands-down the most budget-friendly and long-lasting option for most gardens.
🌻 How to Make a Simple Path
Let’s go step by step! Whether you’re making a path for your flower garden or leading to a cozy corner bench, here’s how to create a beautiful, durable walkway:
Step 1: Plan Your Path
Decide where your path should go. Use a garden hose or rope to outline the shape.
Curved paths feel natural and soft, while straight ones look neat and formal.
I like curvy paths — they make small gardens look bigger and more mysterious, like you’re exploring.
Step 2: Prepare the Ground
-
Remove grass or weeds from the area.
-
Level the soil using a rake.
-
Compact it slightly so the surface is firm.
Step 3: Add a Weed Barrier
Lay down landscape fabric to prevent weeds from growing through your path later. This step saves you a lot of headache!
Step 4: Add Edging (Optional but Recommended)
Edging keeps your path materials in place. You can use wood planks, bricks, or even plastic garden edging.
Step 5: Fill in Your Path
Add your chosen material — gravel, mulch, stones, or wood slices.
Spread it evenly and make sure it’s at least 2 inches thick for stability.
Step 6: Add the Finishing Touches
Once the main path is done, you can decorate it with:
-
Solar lights
-
Flower borders
-
Small garden statues
-
Pebble edges
These small touches make your DIY path look high-end and inviting.
🌾 10 Gorgeous DIY Garden Path Ideas
Here are some creative and affordable ways to style your walkway:
1. Wood Slice Path
If you have a few old logs, slice them into rounds about 2 inches thick and arrange them like stepping stones.
It’s whimsical and perfect for woodland gardens.
Seal the wood with clear coat to make it last longer.
2. Brick Herringbone Path
Lay recycled bricks in a herringbone pattern for a classic, old-world charm. It’s perfect for cottage gardens.
3. Pebble and Stone Mix
Combine pebbles with flat stepping stones for texture and visual interest.
Pro tip: Use darker stones to hide dirt between washes.
4. Gravel and Paver Combo
Frame concrete pavers with gravel borders. It’s easy to walk on and gives a modern, clean look.
5. Mosaic Tile Path
If you have leftover ceramic tiles, create a mosaic path. Mix colors and shapes for an artistic feel.
A friend of mine used old bathroom tiles and turned her side yard into a colorful walkway — it looked like art underfoot!
6. Grass and Brick Checkerboard
Alternate grass and bricks in a checkerboard pattern for a playful garden walkway.
7. Seashell Path
If you live near the coast, use crushed shells as a unique, beach-inspired path. It’s eco-friendly and looks amazing next to succulents or palms.
8. Slate Stepping Stones
Large slate stones spaced apart create an elegant, modern look — especially surrounded by gravel or ground cover plants.
9. Recycled Bottle Border
Use old glass bottles turned upside down as edging for your path. It’s creative, colorful, and environmentally friendly.
10. Fairy Garden Trail
For smaller spaces, make a mini path with tiny stones and plants — perfect for kids or small garden corners.
🌷 A Personal Story: My Backyard Transformation
When I bought my first home, the backyard was just… dirt. It felt empty and forgotten. I couldn’t afford a full renovation, so I started small.
I decided to create a garden path from the back door to a small sitting area under a tree. I used broken tiles from an old bathroom renovation, some leftover gravel, and a bit of imagination.
It wasn’t perfect — but it had personality. Over time, moss grew between the tiles, and it looked even better. Friends always ask who designed it, and I smile, thinking of those long weekends spent piecing it together with my dog watching beside me.
🌼 Pro Tips for Long-Lasting DIY Paths
-
Compact the base soil well.
A solid base prevents sinking and weeds. -
Add sand or gravel underneath heavy stones.
It keeps them level and helps drainage. -
Use edging materials.
This keeps everything tidy and prevents the path from spreading over time. -
Sweep and maintain regularly.
A quick weekly sweep keeps paths clean and inviting. -
Mix textures and materials.
Combining wood, stone, and greenery makes your garden feel layered and rich.
🌙 Bonus Idea: Lighting Your Path
Soft lighting turns your simple DIY path into a magical nighttime walkway. Use:
-
Solar-powered lights
-
Rope lighting along edges
-
Mason jar lanterns on stakes
The glow of warm lights reflecting off gravel or stones makes any garden look like a scene from a fairy tale.
🌺 Garden Path Inspirations for Different Styles
-
Rustic Garden: Wood slices, moss, and pebbles
-
Modern Garden: Large concrete slabs with gravel joints
-
Cottage Garden: Brick or flagstone paths with flowers spilling over edges
-
Zen Garden: Sand, gravel, and large stepping stones with clean symmetry
-
Tropical Garden: Crushed shells or bamboo stepping paths
No matter your style, a path can be both practical and poetic.
🌸 Common Mistakes to Avoid
-
Skipping the base preparation — The path may sink or collect water.
-
Using materials that rot easily — Untreated wood won’t last long.
-
No edging — Without boundaries, gravel or mulch can scatter.
-
Making paths too narrow — Aim for at least 2 feet wide for comfort.
A little extra effort in planning saves a lot of fixing later.
🌿 Final Thoughts: Your Garden, Your Canvas
Building your own garden path isn’t just about design — it’s about creativity and joy. Each material tells a story. Each curve and step reflects your personality.
Your path doesn’t have to be perfect. In fact, the little imperfections often make it more charming. It’s about creating a space that feels yours — peaceful, inviting, and beautiful.
Next time you walk through your garden, take a moment to enjoy the journey, not just the destination. After all, a garden path isn’t just a walkway — it’s the heartbeat of your outdoor sanctuary.


You May Also Like

Expert Tips on Choosing the Right Bedside Lamp for Children: Safety Meets Style

Electra Cooker Oven Symbols Explained: What Each Icon Means and How to Use Them Like a Pro